Pear & Brie Cheese Salad Skewers
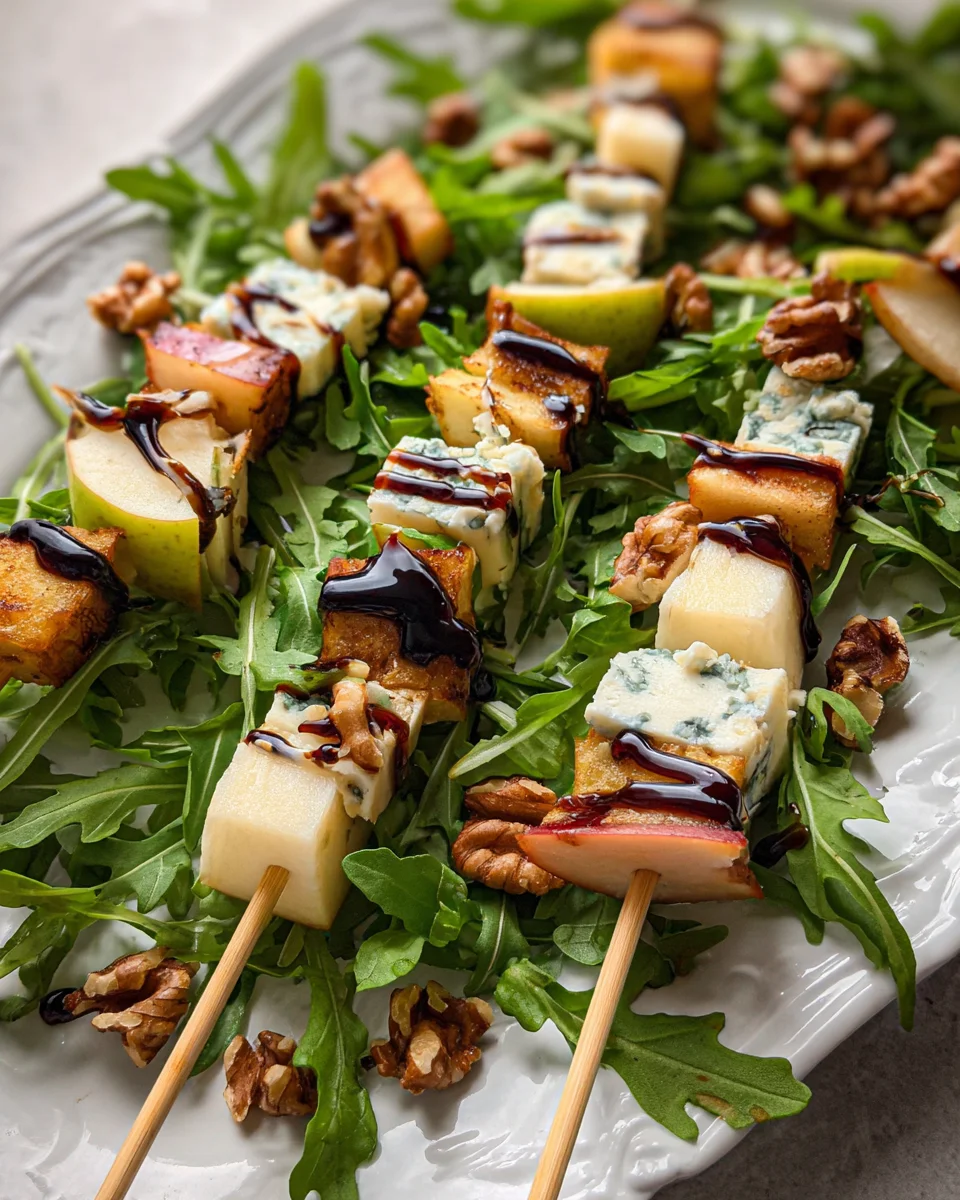
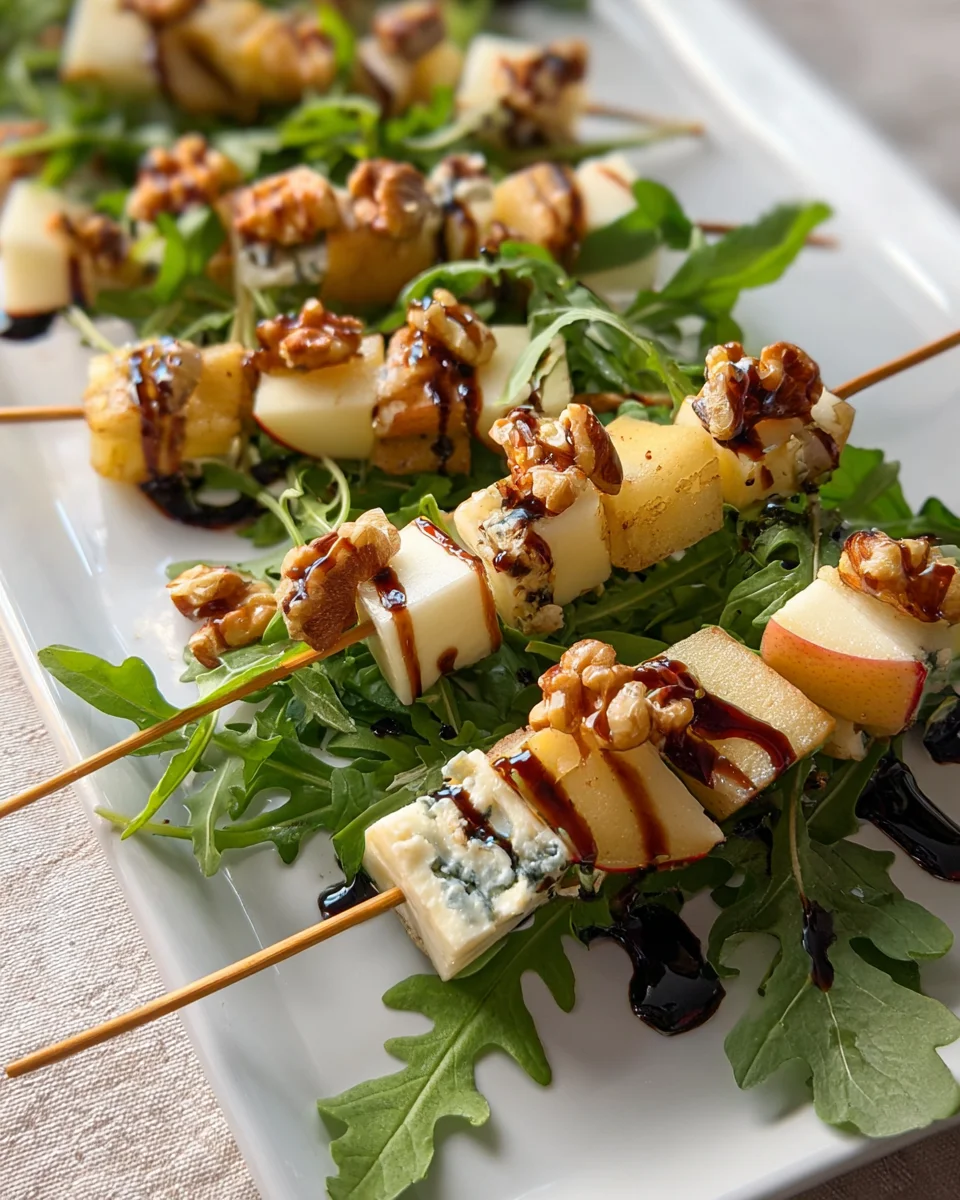
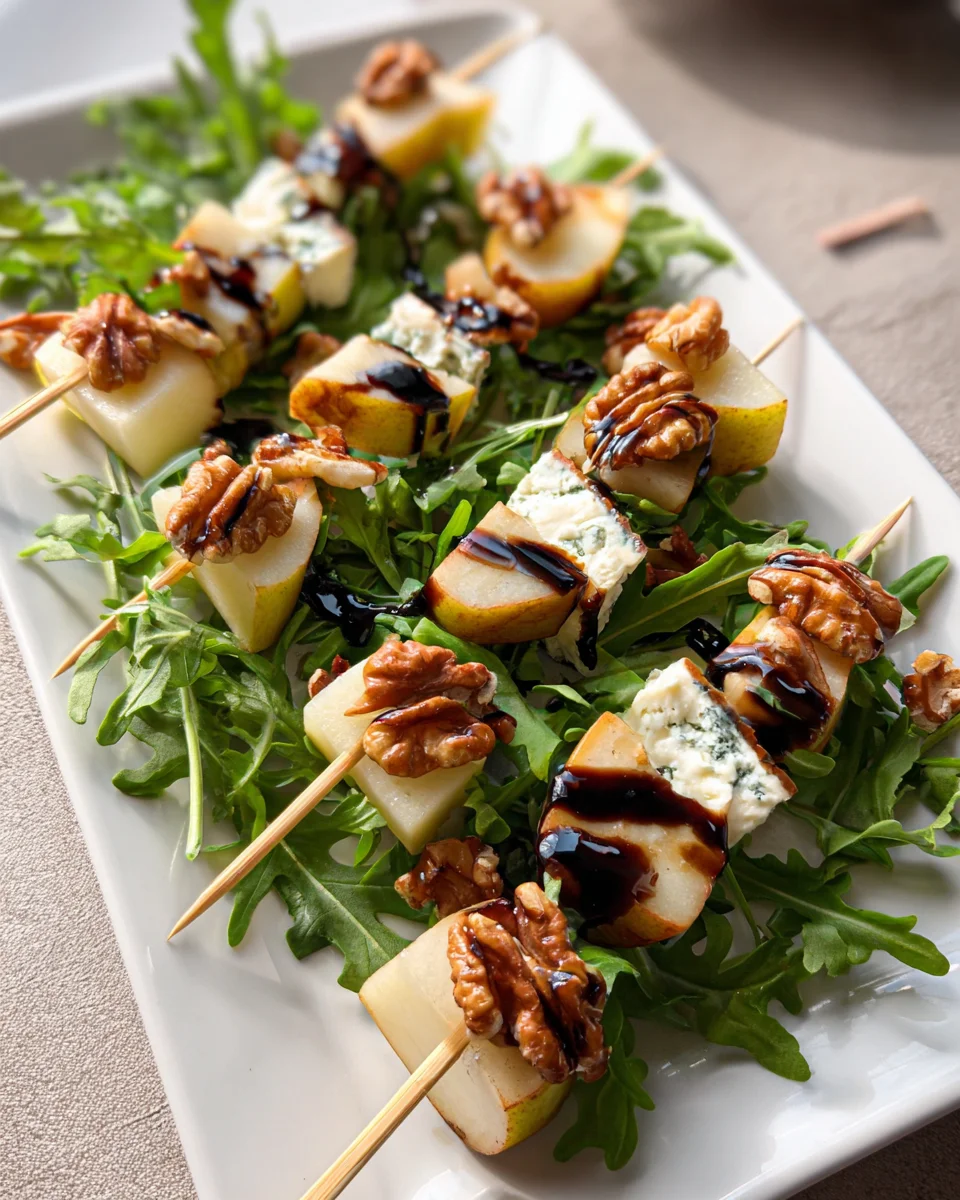
These Pear & Brie Cheese Salad Skewers are a delightful mix of sweet and savory flavors, perfect for any gathering. With juicy pears, creamy brie, and a touch of peppery arugula, these skewers will impress your guests at parties or casual dinners. They are quick to assemble and offer a unique twist on traditional appetizers, making them an excellent choice for various occasions.
Why You’ll Love This Recipe
- Quick to Prepare: These skewers take just 20 minutes to make, making them ideal for last-minute gatherings.
- Delicious Flavor Combination: The pairing of pears with brie cheese creates a rich and satisfying taste that everyone will enjoy.
- Versatile Appetizer: Perfect for parties, picnics, or even as a light snack; they fit any occasion seamlessly.
- Fresh Ingredients: Featuring arugula and walnuts, this recipe is not only tasty but also nutritious.
- Easy to Customize: Feel free to swap in your favorite nuts or greens if you want to change things up!
Tools and Preparation
Before diving into the recipe, gather the necessary tools for easy preparation. Having everything ready will streamline the process and ensure you create perfect skewers.
Grab This Chef Knife Now - Almost Gone!
- Stays Razor-Sharp: Ice-hardened blade keeps its edge longer than ordinary knives
- Superior Grip Control: Unique finger hole design gives you perfect balance and safety
- Built to Last a Lifetime: Premium stainless steel blade with elegant beech wood handle
Customer Reviews ★★★★★
Essential Tools and Equipment
- Small skewers (4-inch)
- Cutting board
- Sharp knife
- Serving platter
Importance of Each Tool
- Small skewers: These are essential for threading the ingredients together in bite-sized portions.
- Cutting board: A good cutting board provides a safe surface for slicing fruits and cheese.
Ingredients
For the Skewers
- 2 pears
- Approx. 8 ounces brie cheese (~225 grams)
- Approx. 2 cups baby arugula
- Approx. 1/4 cup raw walnuts, chopped
- Balsamic glaze, to drizzle (or balsamic vinegar)
How to Make Pear & Brie Cheese Salad Skewers
Step 1: Prepare the Ingredients
- Slice pears into quarters and remove seeds and stem. Cut quarters into roughly 1/2-inch cubes.
- Cut brie cheese into similar-sized, 1/2-inch cubes. TIP: Leaving the rind on can make handling easier!
Step 2: Assemble the Skewers
- Take a small (4-inch) skewer and thread a piece of pear, a bundle of arugula, and then a piece of cheese.
- Place each skewer on a serving platter as you go. TIP: Fold the arugula in half for easy bundling.
Step 3: Finish with Walnuts and Glaze
- Gently press a few pieces of chopped walnuts onto the brie cheese so that they stick.
- Drizzle balsamic glaze over top of skewers before serving.
Enjoy these tasty Pear & Brie Cheese Salad Skewers at your next event!
How to Serve Pear & Brie Cheese Salad Skewers
These pear and brie cheese salad skewers make a stunning appetizer that is both delicious and easy to prepare. Here are some creative serving suggestions to elevate your presentation and impress your guests.
On a Charcuterie Board
- Create an elegant charcuterie board by placing your skewers alongside cured meats, cheeses, and fruits. This adds variety and makes the board visually appealing.
With Fresh Breads
- Serve the skewers with slices of fresh baguette or crackers. This combination offers a delightful crunch that complements the creamy brie and sweet pears.
As Individual Appetizers
- For a more formal presentation, serve each skewer in a small glass or jar. This makes it easy for guests to grab their own without needing utensils.
Paired with Wine
- Offer a selection of wines that pair well with the flavors of the skewers. A light white wine, like Sauvignon Blanc, enhances the sweetness of the pears while balancing the richness of brie.
How to Perfect Pear & Brie Cheese Salad Skewers
To ensure your pear and brie cheese salad skewers are nothing short of perfect, consider these essential tips.
- Choose ripe pears: Selecting ripe but firm pears will add sweetness without becoming mushy when cut.
- Opt for high-quality brie: A good quality brie cheese will enhance the overall flavor, so choose one from a reputable source.
- Prep ingredients in advance: To save time on serving day, wash and chop your pears and arugula ahead of time.
- Use fresh walnuts: Toasting raw walnuts slightly can enhance their flavor and crunchiness, making your skewers even more delicious.
- Experiment with additional toppings: Consider adding honey or crushed red pepper flakes on top for an extra layer of flavor.
- Keep them chilled until serving: Refrigerate the assembled skewers until you’re ready to serve to maintain freshness and texture.
Best Side Dishes for Pear & Brie Cheese Salad Skewers
Pairing side dishes with your pear and brie cheese salad skewers can elevate your appetizer spread. Here are some great options to consider.
- Mixed Greens Salad: A light salad with vinaigrette can balance the richness of brie while complementing the sweet pears.
- Roasted Vegetables: Seasonal roasted veggies add color and flavor while providing heartiness to the meal.
- Stuffed Mushrooms: These savory bites can be filled with cheese, herbs, or breadcrumbs for added depth in taste.
- Pasta Salad: A cold pasta salad with cherry tomatoes and basil can offer a refreshing contrast to the warm flavors of the skewers.
- Cheese Platter: Include a variety of cheeses alongside some nuts and fruits for a diverse tasting experience.
- Fruit Salad: A simple fruit salad featuring seasonal fruits will mirror the sweetness found in your pear skewers.
Common Mistakes to Avoid
When preparing your Pear & Brie Cheese Salad Skewers, avoiding common mistakes will enhance the flavor and presentation.
- Using Overripe Pears: Choose firm pears to ensure they hold their shape on the skewers. Overripe pears can become mushy and fall apart.
- Skipping the Rind on Brie: Leaving the rind on brie cheese helps prevent the skewers from becoming too sticky. Remove it only if you prefer a creamy texture without the rind.
- Not Chopping Walnuts Properly: Ensure walnuts are finely chopped so they stick better to the brie cheese. Large pieces may not adhere well.
- Ignoring Presentation: Skewers should be arranged nicely on a platter. A beautiful presentation makes them more appealing at your gathering.
- Forgetting the Balsamic Glaze: A drizzle of balsamic glaze enhances the flavors. Don’t skip this step; it adds a sweet and tangy finish that complements the salad skewers.
Storage & Reheating Instructions
Refrigerator Storage
- Store leftover skewers in an airtight container.
- They can be kept in the fridge for up to 2 days.
Freezing Pear & Brie Cheese Salad Skewers
- It’s best not to freeze these skewers as they can lose texture and flavor.
Reheating Pear & Brie Cheese Salad Skewers
- Oven: Preheat to 350°F (175°C) and heat for about 5-7 minutes for best results.
- Microwave: Heat on low power for 30 seconds, checking frequently to avoid overcooking.
- Stovetop: Place in a non-stick pan over low heat, turning occasionally until warmed through.
Frequently Asked Questions
If you have questions about Pear & Brie Cheese Salad Skewers, we’ve got answers!
What ingredients are used in Pear & Brie Cheese Salad Skewers?
These skewers include pears, brie cheese, arugula, walnuts, and balsamic glaze for drizzling.
How do I customize my Pear & Brie Cheese Salad Skewers?
Feel free to add different nuts or swap out arugula for spinach or mixed greens based on your preference.
Can I prepare Pear & Brie Cheese Salad Skewers ahead of time?
Yes! You can prepare them a few hours in advance. Just wait to drizzle with balsamic glaze until ready to serve.
How do I serve Pear & Brie Cheese Salad Skewers?
Arrange them on a platter and serve as an appetizer at parties or gatherings for a delightful treat.
Final Thoughts
Pear & Brie Cheese Salad Skewers are not only delicious but also versatile. Their sweet and savory flavor combination makes them perfect for any occasion. Feel free to customize the ingredients according to your taste preferences!

Pear & Brie Cheese Salad Skewers
- Total Time: 10 minutes
- Yield: Approximately 8 servings (8 skewers) 1x
Description
Elevate your next gathering with Pear & Brie Cheese Salad Skewers, a delightful blend of sweet and savory flavors that will leave your guests raving. These easy-to-assemble skewers feature juicy pears, creamy brie cheese, and peppery arugula, drizzled with balsamic glaze for that perfect finishing touch. Ideal for parties, picnics, or casual dinners, these elegant bites are not only visually appealing but also packed with flavor and nutrition. In just 20 minutes, you can create a stunning appetizer that impresses without the stress. Customize them to your liking by swapping in different nuts or greens for a unique twist on this gourmet treat.
Ingredients
- 2 ripe pears
- 8 ounces brie cheese
- 2 cups baby arugula
- 1/4 cup raw walnuts, chopped
- Balsamic glaze (for drizzling)
Instructions
- Slice the pears into quarters and then into 1/2-inch cubes. Remove seeds and stems.
- Cut the brie into similar-sized cubes (leaving the rind on makes it easier to handle).
- On small skewers, thread a piece of pear, a bundle of arugula, and a cube of brie.
- Press chopped walnuts onto the brie and drizzle with balsamic glaze before serving.
- Prep Time: 10 minutes
- Cook Time: 0 minutes
- Category: Appetizer
- Method: No cooking required
- Cuisine: American
Nutrition
- Serving Size: 1 skewer (approximately 50g)
- Calories: 120
- Sugar: 6g
- Sodium: 150mg
- Fat: 9g
- Saturated Fat: 4g
- Unsaturated Fat: 5g
- Trans Fat: 0g
- Carbohydrates: 10g
- Fiber: 2g
- Protein: 3g
- Cholesterol: 15mg

